· solar energy · 6 min read
Sunbathing 101- Solar Panel Placement
Qualifying your home for solar panel installation is like planning the perfect day of sunbathing. Both tasks require a keen understanding of the sun's position and the optimal times to catch its rays.

Qualifying your home for solar panel installation is like planning the perfect day of sunbathing. Both tasks require a keen understanding of the sun’s position and the optimal times to catch its rays. While sunbathing rewards you with a golden tan, understanding solar panel placement and peak sun hours can lead to optimal solar power production. This article is your guide to assessing whether your home is a good candidate for solar energy, helping you navigate the essential factors and tools needed to make an informed decision.
Catching the Perfect Rays: Peak Sun Hours
The first step to planning a day of sunbathing would be to plan a time when it’s going to be the sunniest out, those are your peak sun hours. Solar panels might be exposed to sunlight for about 7 hours on average per day, but the real energy production lies within the 4 to 5 peak sun hours. As you can see from The National Renewable Energy Laboratory’s map, some regions have more peak sun hours than others, giving them a higher production potential.
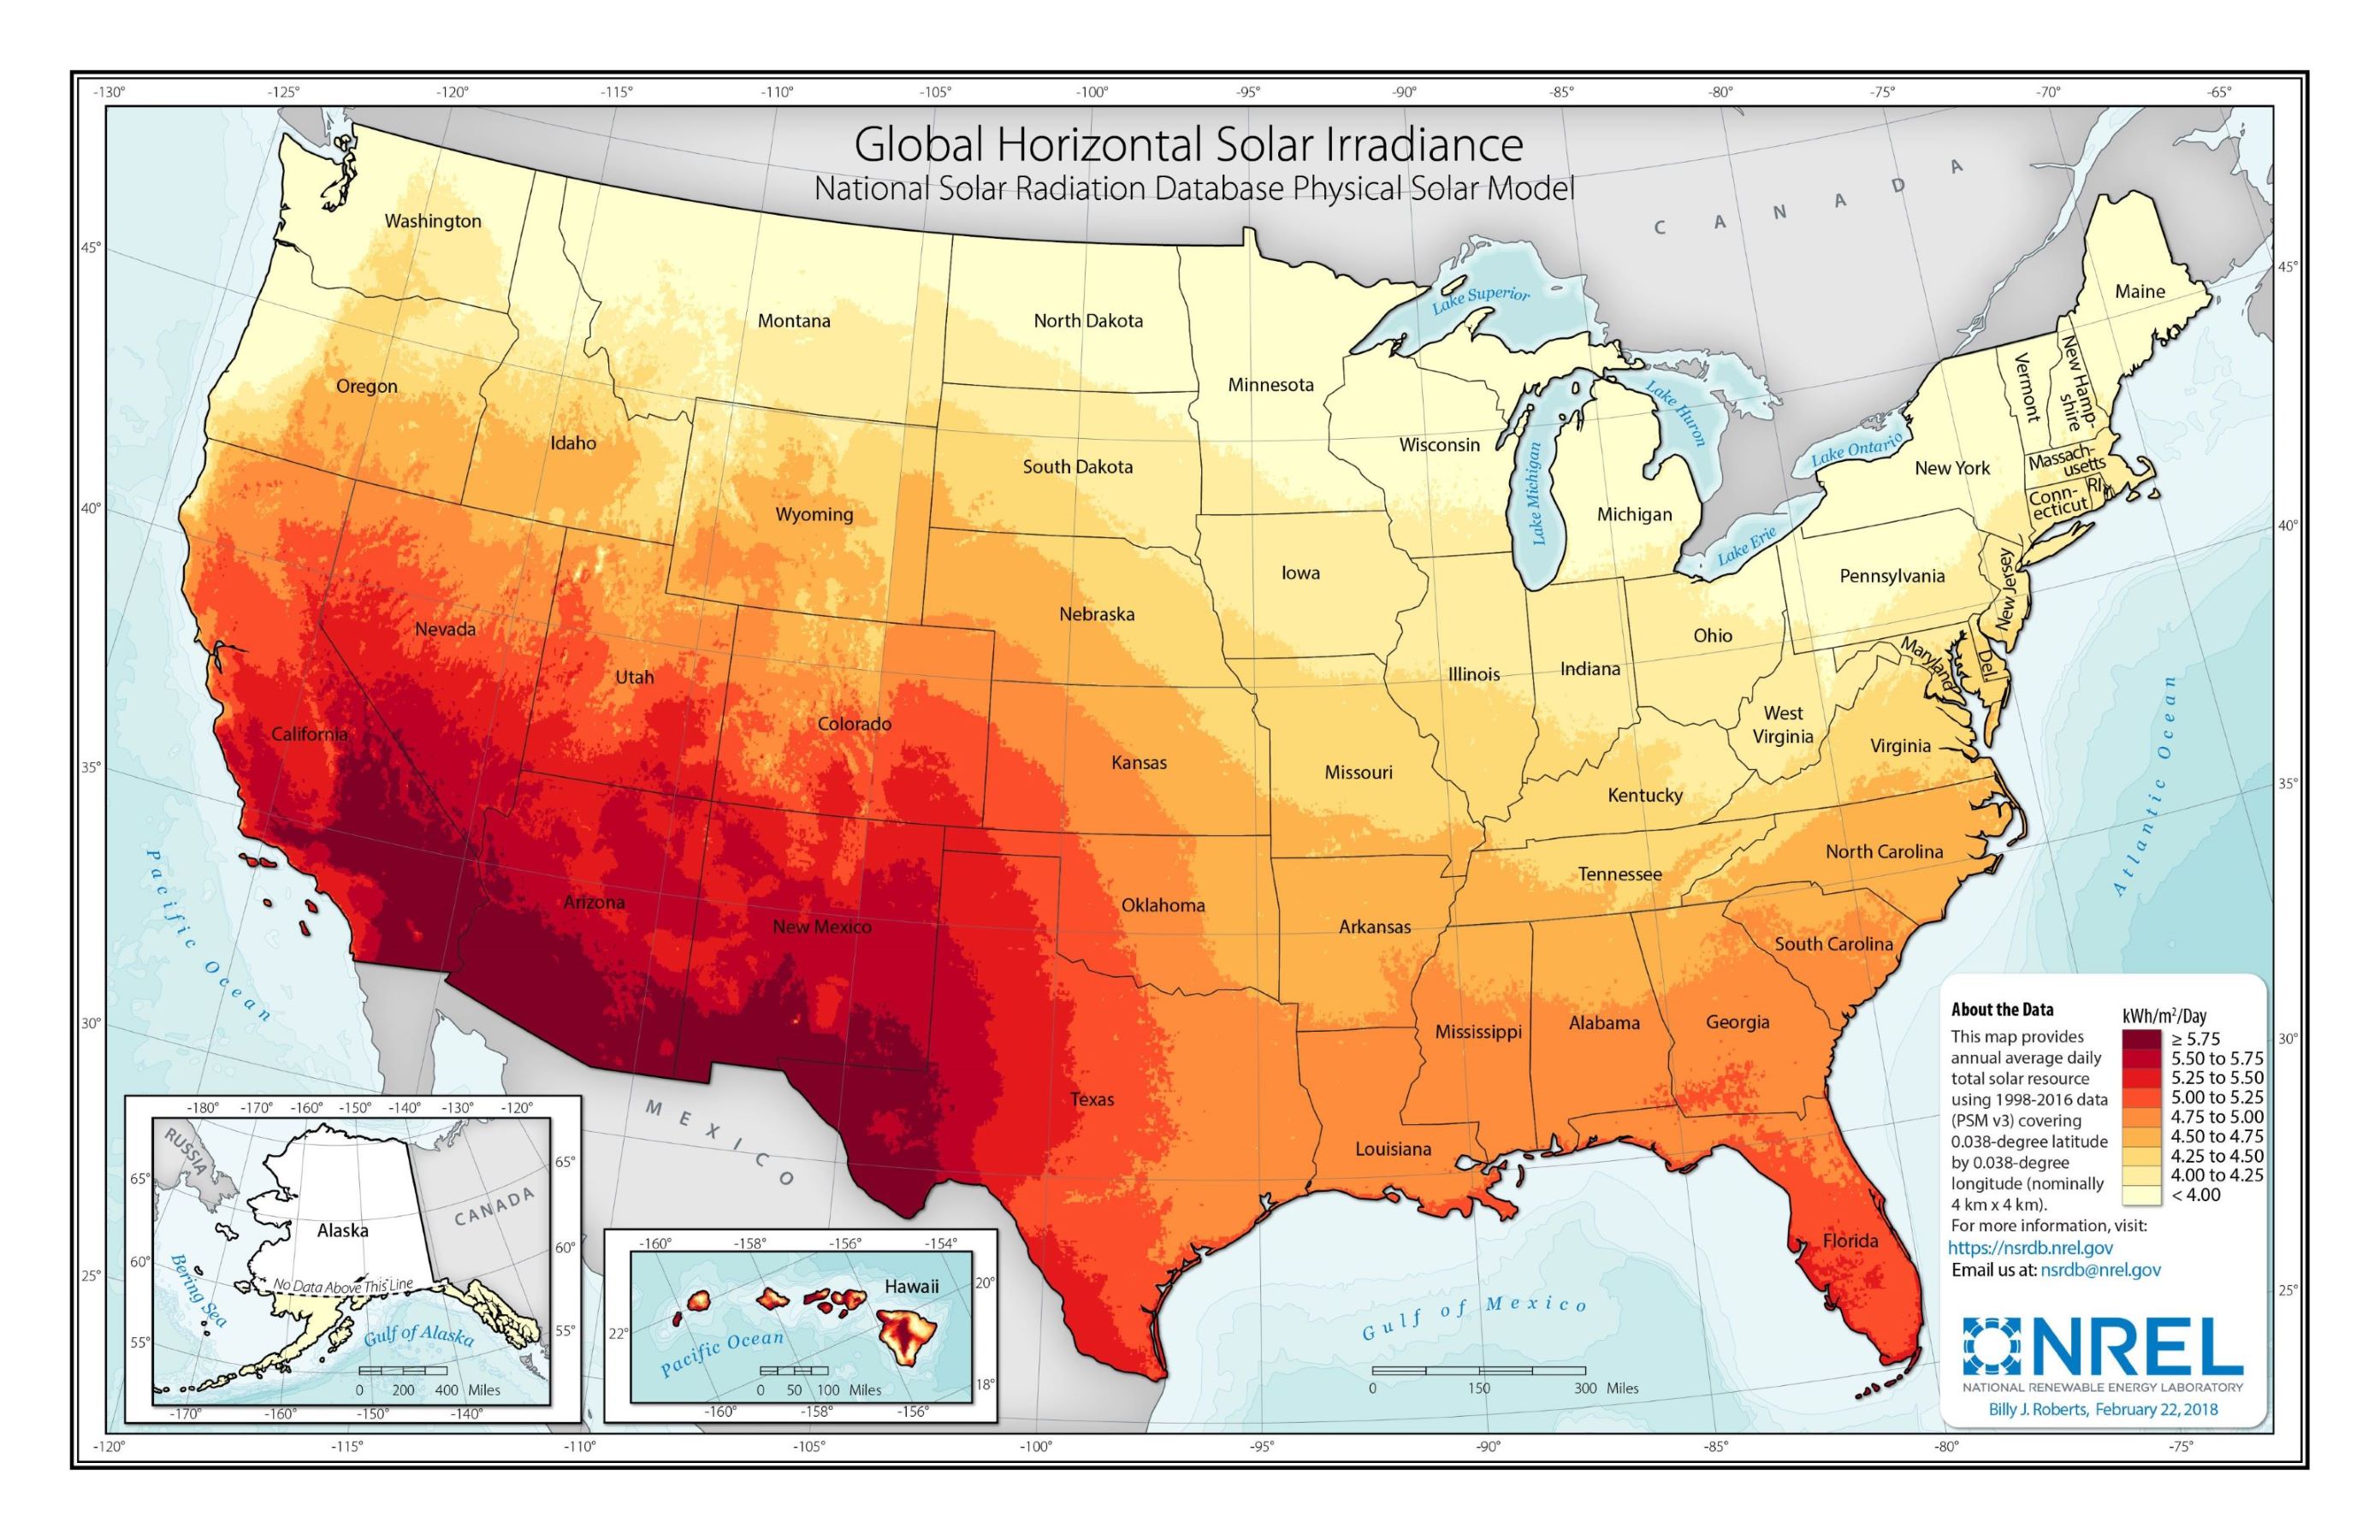
It’s important to note that this map gives a quick overview of peak sun hours across the country, helping you identify the areas with the most peak sun hours. However, this is an annual average. peak sun hours vary across seasons the same as they do across regions. The National Renewable Energy Laboratory’s Solar Resource Data provides a detailed calculation of your area’s average peak sun hours, and monthly seasonal difference.
Not having the ideal amount of peak sun hours isn’t necessarily a deterrent for solar. New York may not look like an ideal region for solar, yet due to their high electricity rates and favorable state programs, they’re a great state to get solar in right now.
Scouting the Perfect Spot: Solar Panel Placement
Once you have your tanning times down, the next step is to scout the perfect location. Just as a sunbather would look for the ideal spot to soak up the sun, finding the right location for your solar panels is crucial. In the northern hemisphere, south-facing panels absorb the most sunlight. Southwest or southeast-facing panels produce around 8% less energy, while east or west-facing panels produce about 20% less energy than their south-facing counterparts. Interestingly, west-facing panels can sometimes be more efficient during peak demand hours, which is when you get your real production power.
But these numbers are based on perfect conditions. You still have to consider factors like roof tilt and shading. The roof pitch affects solar panel orientation, with the ideal angle in the US being between 30 and 40 degrees. If your roof’s pitch is suboptimal, it can be corrected with specific mounting systems. The last consideration is potential sun blockers like tall trees or nearby structures.
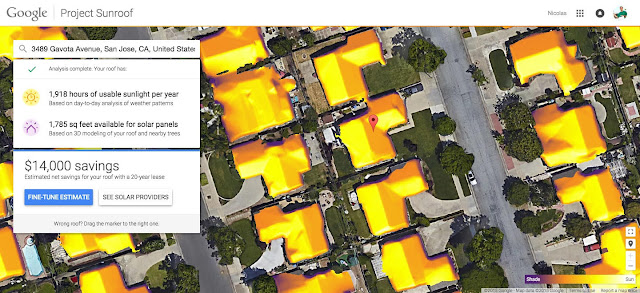
It might seem like a complex process, but fortunately, there are tools to help. Google’s innovative Project Sunroof is a handy tool in this process. It creates a 3D model of your rooftop, highlighting areas with maximum solar potential and pointing out possible sun blockers. However, remember that this tool provides potential capacity, not a definitive recommendation. Your ultimate energy offset strategy will determine the size of your system, and the placement of the panels, considering these obstacles, is key to maximizing solar energy production.
How to Understand Shade Reports from Solar Companies:
When considering solar panel installation, solar companies often provide a Shade Report. This report analyzes the shading impact on each module group of your system design, including factors like tilt, azimuth, and sun access. Understanding this report is crucial to ensure that the proposed panel placement aligns with your home’s unique shading conditions. Here’s what you need to know:
Solar Access Percentage: This is the percentage of sunlight that reaches your solar panels after accounting for shading from objects like trees or buildings. A Solar Access percentage of 90% or higher is considered excellent, meaning most of the sunlight reaches your panels without being blocked. If the percentage falls below 75%, it may indicate significant shading obstacles, and it may not make sense to install the panels until something changes, such as removing shading obstacles or finding a different location for the panels
Total Solar Resource Fraction (TSRF) Percentage: TSRF is a measure that combines Solar Access with the orientation of your panels tilt and direction. It tells you how much of the available sunlight your panels can actually use to produce energy. A TSRF percentage of 80% or higher is considered good, meaning your panels are well-positioned to capture and use 80% of the available sunlight. If the TSRF is less than 70%, it indicates that the proposed panel placement may not be efficient, and it doesn’t make sense to install the panels until something changes, such as removing a shading obstacle or waiting for new technology that might be more efficient under these conditions.
These numbers provide valuable insights into the potential efficiency of your solar panel system. By understanding Solar Access and TSRF, you can make informed decisions about your solar panel placement, ensuring that you make the most of your investment in solar energy. Whether you have an ideal roof for solar or need to explore other energy efficiency options, these tools and insights empower you to make the best choices for your unique situation.
Using the PV Watts Calculator: Your Guide to proper solar energy production
The PV Watts calculator is a valuable tool for assessing solar panel efficiency. Developed by the National Renewable Energy Laboratory (NREL), it provides tailored estimates of energy production based on your location, system specifications, and shading effects. Here’s how it can assist you:
- Location and System Analysis: Enter your specific location and system details like size, tilt angle, and orientation for an accurate estimate of solar energy production.
- Shading Consideration: The calculator factors in shading from nearby obstacles, offering a realistic view of energy production.
- Cost and Savings Insights: Get an overview of potential cost savings and payback period, guiding your investment decision.
- User-Friendly Interface: Experiment with different scenarios to see how changes affect energy production and savings.
The PV Watts calculator helps you understand how your particular solar panel system might perform, ensuring you make the most of your unique situation. Whether solar is a perfect fit or only suitable for partial energy offset, this tool guides you towards informed decisions.
Conclusion
Determining whether your home is a good candidate for solar energy is no day at the beach, but with the right tools and knowledge, it becomes a manageable and insightful process. By understanding peak sun hours, scouting the perfect spot for solar panels, interpreting shade reports, and utilizing tools like the PV Watts calculator, you’re laying the groundwork for a well-informed decision. After understanding these essential concepts, the next steps in your qualification process will involve analyzing your energy consumption, understanding TOU rates and, and considering battery storage options. If you’re ready to continue your research, read our next step from flip phones to solar homes